Driveway Sealcoating in Tampa
 Why do you seal an Asphalt Driveway Driveway sealers block water and protects the asphalt from UV rays that also damage asphalt. Sealing your driveway every 1 to 3 years, depending on use and climate, will greatly improve your driveway’s life. Sealing your driveway also helps to keep oil and spilled gas from damaging your driveway. A proper driveway sealcoat will also makes your driveway easier to clean, as leaves, snow, and other debris don’t get stuck in the rough surface of an un-sealed surface.
Most professional driveway sealing companies use a top quality commercial grade coal tar sealer, which is the longest lasting product on the market. All parking lots are sealed with coal tar sealer. If you decide to go with a professional you should ask about the products they will use to sealcoat your driveway.
Driveway sealing is and easy DIY Project that any homeowner can perform. Before you plan to start your project here are 8 tips that can improve the quality of your work and reduct the number of time you run to the local home improvement store.
- Trim the grass around a driveway prior to starting.
- Thoroughly sweep and blow any debris off the surface.
- Buy tape or rope to prevent people from accidentally walking or driving on the driveway.
- Clean oil stains prior to sealing. Kitty Litter, Dawn Dish washing soap, or sand can help absorb and remove oil
- Pull the cars or anything you need out of the driveway prior to starting the project
- Sealer can handle small cracks but prior to starting use and asphalt patch to seal larger cracks. Remember to clean the cracks.
- Any area near a garage door, walkway, or plants needs to be hand sealed with a brush so the sealer goes where it should. Many people want to short cut this step but taking your time will produce a better quality look. Buy a quality hand brush
- For large driveways a sprayer is used after the hand brushing. Work around the edge to ensure complete driveway coverage.
- If the forecast is calling for rain anytime during your project day, reschedule as driveway sealer is impossible to cleanup.
Repairing the Cracks
- Sweep in and around cracks to remove organic debris and pebbles.
- If you cracks have weed or grass be sure to remove.
- Once clean use a high quality asphalt patching compound to fill the cracks.
- Use a trowel to press the compound into the cracks. Make sure the compound is smooth and free if dirt or pebbles.
Prior to starting a driveway sealcoating project complete the check list above. I like to avoid running to and from the home improvement store so do a quick assessment and start your cleanup and patching a day or the weekend prior to the sealing project.
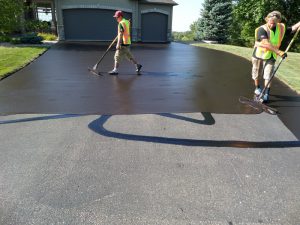
To seal your driveway once you have hand sealed areas defined above pour about 2 gallons of sealer on the driveway. It is important to work in small areas, keep coverage thin as possible. A squeegee will help pull the sealer up to your brush sealed areas. The sealer will need several hours to dry so start the project early in the day so the mid day sun can help. Most important read the instructions on the sealer you decide to use.
Putting a fresh coat of sealer on your asphalt driveway can make a huge impact on curb appeal, and definitely extends the life of your driveway.